Creating the negative polyurethane core
- alinarads
- Apr 22, 2021
- 3 min read
This blog will cover the prep and steps to creating the negative to the snap core pair. This will complete the two piece that will be squashed together creating the end prosthetic piece.
The prep:


Figure 1 & 2
The positive snap core is first prepped with buff clay around the base to insure the positive and negative fit together seamlessly when later squashing together.

Figure 3
The core is sprayed with a release agent and Vaseline, this insures the polyurethane will not stick to itself and the two parts can come apart.


Figure 4 & 5
Using a glue gun, Styrofoam board is glued around the clay base to create walls when later pouring the polyurethane.


Figure 6 & 7
The Styrofoam is trimmed for easier access, Styrofoam is used as it is a cheaper more cost-effective technique with less mess compared to using clay walls or plastic walls.
The process:
The following steps are done wearing full PPE mentioned in previous blogs: Overalls, Goggles, Respirator and double gloves.


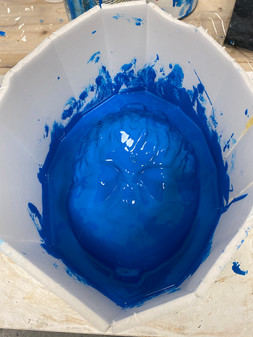
Figure 8 & 9
The first 3 layers of polyurethane are brushed on creating a ‘brush layer’ this picks up the detail of the sculpt in a light layer.
The measurements mixed to create the brush strokes were:
150g of polyol : 30g of isocyanate
Then increasing the volume slightly to
200g : 40g of isocyanante


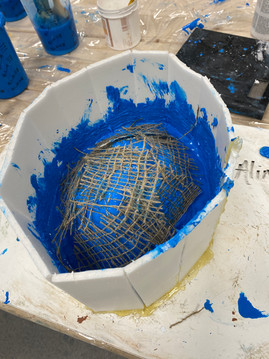
Figure 10 & 11
Due to been a large mould, two layers of polyurethane mixed with polyfibre is coated on, This was done in the largest measurement 200g polyol : 40g isocyanate, as polyfibre doubles the mixture and adds volume. Scrim is added on the last layer for the plaster to grip onto something.
If this sculpt and core was smaller it would be poured with pure polyurethane, however the method of polyfibre and plaster is more cost effective as it saves on resources.


Figure 12 & 13
The polyurethane layers are topped with plaster.


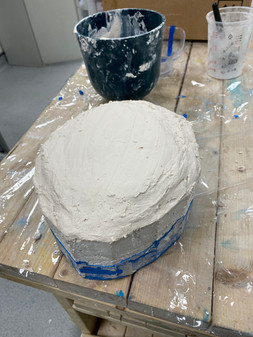
Figure 14 & 15
After removing the Styrofoam board, the student realised there was not enough plaster, this resulted in the negative rolling around when laid on its back. Shown in figure 14 and 15 a thick plaster mixture was mixed and smoothed to create a level surface.

Figure 16
After removing the prep, the positive is visible. To separate the two pieces its important to be gentle but firm when parting the two. Using a chisel and hammer leverage is created in the joint, slowing releasing all sides and the keys. Its important to not hit the hammer hard and forcefully pull the two appart as it can crack the negative polyurethane and or mark the positive with chisel scratch marks.

Figure 17
The two pieces apart, this is now the completed snap mould. The mould is rasped and tidied up to get rid of sharp edges and to ensure the two pieces fit snug. The positive and negative are cleaned and the clay is removed but kept for a later stage.

Figure 18
The cleaning of the negative proved most difficult due to the intricate design, using white spirit to dissolve the clay and a small pin/hair clip the clay was scraped out to remove as much as possible.

Figure 19
The finished snap core positive and negative, cleaned and ready to run silicone prosthetics in a following blog.
In refection the snap mould came out successfully, the positive and negative fit together seamlessly and the sculpt remained intact.
---------------------------------------------------------------------------------------------------------------------------
Figures:
Fig 1 - (Radfelder A, 2021) Finished snap core positive, York College
Fig 2 - (Radfelder A, 2021) Buff clay applied to positive, York College
Fig 3 - (Radfelder A, 2021) Positive prepped with release adjent, York College
Fig 4 - (Radfelder A, 2021) Styrofoam board glued, York College
Fig 5 - (Radfelder A, 2021) Styrofoam board glued, York College
Fig 6 - (Radfelder A, 2021) Trimmed styrofoam board, York College
Fig 7 - (Radfelder A, 2021) Birdseye view of styrofoam prep, York college
Fig 8 - (Radfelder A, 2021) First brush stroke polyurethane, York College
Fig 9 - (Radfelder A, 2021) Third brush stoke polyurethane, York College
Fig 10 - (Radfelder A, 2021) Polyfibre polurethane layer, York College
Fig 11 - (Radfelder A, 2021) Scrim added to polyfibre layer, York College
Fig 12 - (Radfelder A, 2021) Topped with plaster, York College
Fig 13 - (Radfelder A, 2021) Negative topped with plaster, York College
Fig 14 - (Radfelder A, 2021) Side view of new plaster layer, York College
Fig 15 - (Radfelder A, 2021) Extra plaster layer, York College
Fig 16 - (Radfelder A, 2021) Positive and negative ready to be seperated, York College
Fig 17 - (Radfelder A, 2021) Positive and negative apart, York College
Fig 18 - (Radfelder A, 2021) Cleaned out negative, York College
Fig 19 - (Radfelder A, 2021) Finished cleaned snap core, York College


Comments