Colouring prosthetic pieces and practice application
- alinarads
- Jun 3, 2021
- 3 min read
Updated: Jun 15, 2021
This blog will cover the colouring of the final prosthetic pieces and a practise application in preparation for the final assessment.
Step by step colouring of flat moulds and snap mould prosthetic:

Figure 1
To get a strong pigment of colour the student chose grease paints to colour their pieces, rather than using ipa (isopropyl alcohol) activate paints that need multiple washes of colour. Using grease paints meant that only 3 layers of colour was needed.
Originally using ipa to active the grease paints for the practice colouring, the student found that the paint was hard to blend down the prosthetic as the ipa started to melt the ipa based cap plastic, forming holes in the bottom of the piece.
After consulting with a tutor, the idea was given to use airbrush silicone based cleaner and thinner. Surprisingly it worked perfect and produced a workable consistency as well as fast drying.


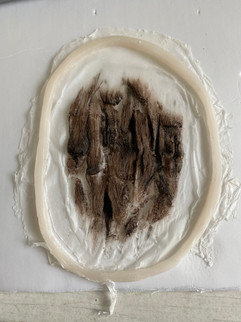


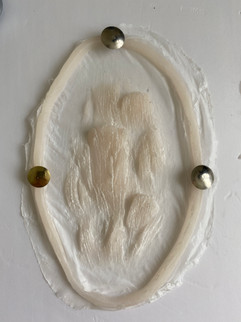


Figure 2 - 10
The first images of the flat moulds showing the silicone piece without colour compared to the last images showing the finished colouring. This was achieved by painting a base layer of brown adding more in the depths of the piece and where the shadows would sit from the raised pieces of bark. The brown brought out the detail in the flat moulds showing the intricate details and texture. Black is added into the contours of the wood and tips of the raised pieces of bark to give depth and dimension. The pieces were finished off with green blotted on in random areas to give the impression of moss and add some colour for interest.


Figure 11 - 14
The same technique and application was used for both flat moulds and the snap mould prosthetic shown above. Using multiple layers of brown as the base, dimension is made with black in the cracks to create shadows and depth within the piece. Green is added to bring colour and give the appearance of moss.
In reflection to the colouring of the prosthetic pieces, the student is extremely impressed with the outcome as the colouring went exactly as planned. Using the method of painting the pieces after they had been run worked out better as it gave the student more control of placement of colours and the tone of colour used.
Unfortunately their is not many images on other tree texture flat moulds or colouring to compare with industry standards.
Application practice:


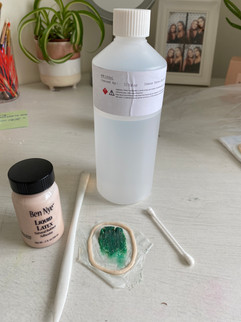


Figure 15 - 23
To practice the application of a silicone flat mould, the student chose a previous practice flat mould to work with. Starting with an adhesive, the student had no prosade at home to use, to adapt they used latex as it is a similar consistency. Gluing the prosthetic as well as the skin for a secure grip, the cutting edge is trimmed as its not needed. After trimming the excess edge, the remaining cap plastic was blended into the skin with ipa to create a seamless edge. Figures 21 & 22 showing the sides of the piece. To finish off the student added some black to improve the appearance, although the colouring of the moulds is different for the final look the practice application was successful and prepared the student.
-----------------------------------------------------------------------------------------------------------------------------------------Figure list:
Figure 1 - (Radfelder A, 2021) Colouring paints and brushes
Figure 2 - (Radfelder A, 2021) Chest flat mould before colouring
Figure 3 - (Radfelder A, 2021) Chest peice coloured brown and black
Figure 4 - (Radfelder A, 2021) Finished chest piece
Figure 5 - (Radfelder A, 2021) Extra pieces flat mould before colour
Figure 6 - (Radfelder A, 2021) Extra peices painted brown and black
Figure 7 - (Radfelder A, 2021) Finished extra peices with added green
Figure 8 - (Radfelder A, 2021) Arm flat mould before colour
Figure 9 - (Rdafelder A, 2021) Arm flat mould with brown and black paint
Figure 10 - (Radfelder A, 2021) Finished arm flat mould
Figure 11 - (Radfelder A, 2021) Forehead prosthetic before colour
Figure 12 - (Radfelder A, 2021) Forehead prosthetic base coat of brown
Figure 13 - (Radfelder A, 2021) Forehead prosthetic with add black for shadows
Figure 14 - (Radfelder A, 2021) Finished Forehead prosthetic with green
Figure 15 - (Radfelder A, 2021) Chosen practise piece
Figure 16 - (Radfelder A, 2021) Tools needed
Figure 17 - (Radfelder A, 2021) Flat mould applied
Figure 18 - (Radfelder A, 2021) Cutting edge trimmed
Figure 19 - (Radfelder A, 2021) Cutting edge removed ready to blend cap plastic
Figure 20 - (Radfelder A, 2021) Blended cap plastic
Figure 21 - (Radfelder A, 2021) Side profile of prosthetic piece
Figure 22 - (Radfelder A, 2021) Side profile of prosthetic piece
Figure 23 - (Radfelder A, 2021) Finished applied piece


Comments