Costume design and development
- alinarads
- May 20, 2021
- 6 min read
Updated: Jun 15, 2021
This blog entry will cover the construction of the outfit and headdress for the student’s character.
The students original costume design compared to the new design:


Figure 1 & 2
In comparison of the two designs it clearly shows that the student has thought out their design more thoroughly, this is evident in the detail of the drawings and the more in-depth labelling.
To achieve the design the student set a low budget for themselves as most of the foliage used to decorate the dress and headdress will be naturally sourced and the dress will be 70% covered, therefore a cheap base dress is needed so the student does not have to make one from scratch.
The costume making process:
Starting with a base dress the student chose between the options below:


Figure 3 - 8
After choosing the £11.00 camo maxi dress the student had the model try it on for any alterations to be done before constructing the corset and gluing the moss and foliage. While there the student got measurement for the head dress and corset.
After the model tried on the dress it was apparent that it was slightly tight due to the design not having a zip. Therefore, the student has re considered their design as the foliage will fall off when putting the dress on. The decoration on the dress will be made from paper leaves painted and then the moss and natural foliage will be added on the day of application.
Making leaves:


Figure 9 & 10
To create multiple leaves at once the student taped 8 A4 pieces of paper together and created leaf shapes.


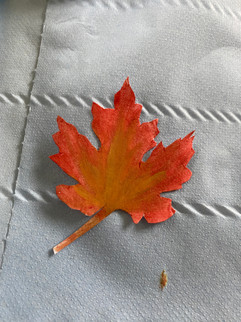
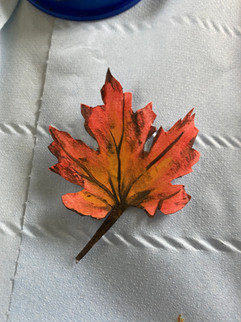

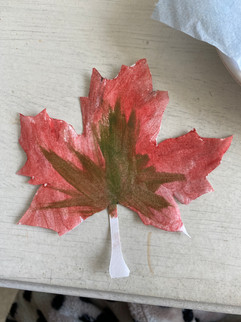


Figure 11 - 19
Using face and body paint to create the leaves using reference images, once dried the leaves are crumbled and sprayed with hair spray to give a crispy effect. This process was repeated multiple times to make around 100 leaves.
Painting the dress:


Figure 20 & 21
To darken the dress and remove the unattractive ‘camo print’ from the dress. Body paint was used to paint black and brown on the chest and hips where the edge of the corset will sit.
Creating the corset:


Figure 22, 23, 24 & 25
To create the corset, a mannequin is protected with a bin bag then the bark is soaked to be more malleable.


Figure 26, 27 & 28
After soaking for 30 mins the bark is placed against the mannequin and tightened around, every 10-20 minutes the belt is tightened more to squeeze out the water and get the perfect bent shape.


Figure 29 & 30


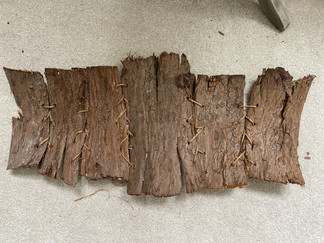

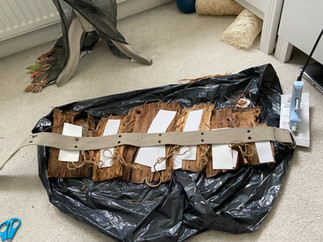
Figure 31, 32 & 33
The pieces of bark are sewn together, using garden twine and scissors to create holes to create a ‘lace up’ effect. After each tree bark section is add, at this point the bark was extremely delicate from previously soaking it and drying it out, some support and method to wear it was needed. Using a glue gun card was added to the centre of each piece of bark, and a belt was added to be able to wear the costume.
Finishing touches to costume:


Figure 34, 35 & 36
Improvising, a woven straw material figure 34 was sprayed black and made into belts to attach the leaves to. Using the painted leaves previously made, they were hot glued in layers to create a waterfall of leaves down one side of the dress as well as coming out of the top of the corset.
The finished costume:

Figure 37
Adding last minute leaves onto the hips to give a more flattering shape the costume is complete and ready for assessment day. Dried moss will also be added on the day in the top of the corset and glued to the bottom of the skirt covering it.
Constructing the Headdress:


Figure 38 & 39
Using a simple cling wrap technique and Sellotape method to measure the model’s head. This gives a rough guide for how big the frame should be made.


Figure 40 & 41
Using a wig block to hold the headdress in place, a basic wig frame base is made with armature wire and secured with tape.


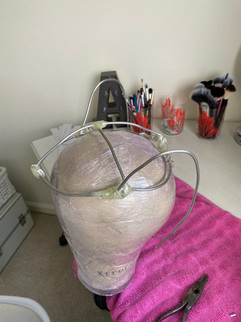


Figure 42 - 45
Using more armature wire long curved pieces are added onto the sides, this is for later when forming the horns out of foam. The horns will slide onto the wire and be secured at the base. Card is also added to make a base.


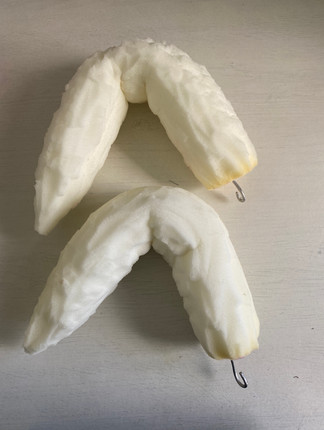
Figure 46, 47 & 48
The horns are cut out of thick foam then shaped with scissors to create a cylinder shape. Wire is added into the horns to add structure and shape. The next steps would be to roll the horns in latex and paint.
After much deliberation and putting off doing the headdress, the student made a decision to scrap the idea and focus their attention on the prosthetic pieces’ quality. With only a week until their assessment it was adding stress onto the student, instead the student decided to make a smaller headdress to ease the stress.


Figure 49, 50 & 51
The simpler headdress was made with armature wire, card and tree bark. Creating a wire frame that fits the circumference of the head, then adding the card to create a base for the bark to sit on. The bark is cut into small pieces and glue gunned onto the card with final touches of moss.
In reflection to creating the costume the student thoroughly enjoyed the process, sparking an intrest into costume making. The costume could have been improved with more time and attention if it was the main piece for the assessment. The student was extremely happy with the costume with it being their first one.
-----------------------------------------------------------------------------------------------------------------------------------------
Figures:
Figure 1 – (Radfelder A, 2020) Original costume design for prosthetic module
Figure 2 – (Radfelder A, 2021) New costume design for prosthetic module
Figure 3 – (Radfelder A, 2021) Dress option for clothing design
Figure 4 – (Radfelder A, 2021) Dress option for clothing design
Figure 5 – (Radfelder A, 2021) Dress option for clothing design
Figure 6 – (Radfelder A, 2021) Dress option for clothing design
Figure 7 – (Radfelder A, 2021) Dress option for clothing design
Figure 8 – (Radfelder A, 2021) Dress option for clothing design
Figure 9 - (Radfelder A, 2021) Leaves drawn out
Figure 10 - (Radfelder A, 2021) Leaves cut out ready to be painted
Figure 11 - (Radfelder A, 2021) Oak leaf outlined
Figure 12 - (Radfelder A, 2021) Oak leaf detailed
Figure 13 - (Radfelder A, 2021) Simple leaf outlined
Figure 14 - (Radfelder A, 2021) Simple leaf couloured
Figure 15 - (Radfelder A, 2021) Small read and yellow leaf before
Figure 16 - (Radfelder A, 2021) Small red and yellow leaf detailed
Figure 17 - (Radfelder A, 2021) Maple leaf before Figure 18 - (Radfelder A, 2021) Maple leaf after
Figure 19 - (Radfelder A, 2021) Oak leafs finished Figure 20 - (Radfelder A, 2021) Dress before painting Figure 21 - (Radfelder A, 2021) Dress after painting Figure 22 - (Radfelder A, 2021) Bark selection Figure 23 - (Radfelder A, 2021) Equipment to make corset Figure 24 - (Radfelder A, 2021) Prepped mannequin Figure 25 - (Radfelder A, 2021) Bark soaking
Figure 26 - (Radfelder A, 2021) Wet bark moulded to mannequin front view Figure 27 - (Radfelder A, 2021) Wet bark moulded to mannequin side view Figure 28 - (Radfelder A, 2021) Wet bark moulded to mannequin back view Figure 29 - (Radfelder A, 2021) Dried bark on mannequin Figure 30 - (Radfelder A, 2021) Dried bark on mannequin Figure 31 - (Radfelder A, 2021) First peices of bark sewn together
Figure 32 - (Radfelder A, 2021) Finished bark corset bark sections
Figure 33 - (Radfelder A, 2021) Belt attached to corset
Figure 34 - (Radfelder A, 2021) Woven material template for leaf belts
Figure 35 - (Radfelder A, 2021) Extra peices for leaves to attach to woven belts
Figure 36 - (Radfelder A, 2021) First leaves added to belts
Figure 37 - (Radfelder A, 2021) Finished outfit
Figure 38 - (Radfelder A, 2021) Templating for headdress Figure 39 - (Radfelder A, 2021) Templating for headdress Figure 40 - (Radfelder A, 2021) Basic frame on wig block Figure 41 - (Radfelder A, 2021) Head dress frame Figure 42 - (Radfelder A, 2021) Wire frame with added horns Figure 43 - (Radfelder A, 2021) Wire frame with added horns Figure 44 - (Radfelder A, 2021) Wire frame with cardboard Figure 45 - (Radfelder A, 2021) Wire frame with carboard
Figure 46 - (Radfelder A, 2021) Foam ready to be shaped into horns
Figure 47 - (Radfelder A, 2021) Shaped foam
Figure 48 - (Radfelder A, 2021) Foam horns
Figure 49 - (Radfelder A, 2021) Start of simpler headdress
Figure 50 - (Radfelder A, 2021) Added bark to simple headdress
Figure 51 - (Radfelder A, 2021) Moss added to final headdress


Comments